2.1.1/2.1.2/2.1.3/2.1.4/2.1.5/2.2.1/2.2.2/2.2.3/2.2.4 - Task Three
Making minor imperfections.
This is the source image I began with, I wanted a close up picture of a face that doesn't involve hair or any sort of background so this image was perfect for what I was looking for.

I began with decreasing the saturation to get a natural look. I then used the Sponge Tool to gently soak up some of the colour from the person's lips. I then used the Burn Tool along with the Dodge Tool to create gentle patches of light and shadows. Although this process is hardly noticeable; the outcome of more manipulation was too noticeable.

This is the final image I produced using all the tools mentioned above.

Full out - manipulate the same or similar image into a zombie.
This is the new image I started with:

To start off with I used the Sponge Tool to remove colour in the person’s lips. I then used the Burn Tool to create the effect of bags underneath the eyes.

I used the Liquify Filter to distort the eyes, nose and lips to give the person a creepy, sinister facial expression along with magnified eyes.

I then decreased the saturation within her face and fiddled with the colour balance to create a great pale zombie look.

I used the Burn Tool around the lips and eyes to give a dark shadowed effect.

I then used the Pen Tool to draw around the clothing and removed the colour. I then used the Blur Tool around the eyes to make them cloudy. Lastly, I used the Brush Tool to create wrinkles around the face then covered them with the Burn Tool to create the ultimate zombie effect.

Super Impose three images into a background of some sort.
This is the source image that I started with, I wanted an image that had plenty of room to manipulate some images into but at the same time not too dull, I also wanted a nice sunlight to help create some good shadows.

I then added an image of an elephant, something original and easy. I used the magic Wand tool to select the white background around the elephant and then removed it so that it would fit in with the source image.


Even though the elephant already has a shadow I removed it using the Magic Wand tool and created my own as the purpose of the demo was to learn. To create the shadow I copy and pasted a new elephant, filled it with black, flipped it and lowered the opacity to scale with the surroundings.

I then added an image of an aeroplane, once again I removed the background using the magic wand tool with tolerance set to 20 then put it in the original image, scaled it down to size and tweaked the contrast and brightness to help it blend in.


To make the aeroplane fit in even more, using a thin, fine brush I gently created some contrails coming out the back with an opacity of 60%.
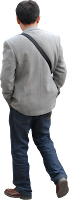
Finally, I added a simple image of a man walking, there was no background included with this image so I just dragged it straight into the original image then scaled it down to size. I then created a shadow for the man by duplicating him, filling him in black, rotating to match and finally lowering the opacity to 70%

We were given a demo on how to create a flag using this technique. Firstly I created a new file in Photoshop with the dimensions of 1000pixels in height by 667pixels in width. I then used the rectangular marquee Tool to create a rectangle then copied it three times and filled them with colour using the Paint Bucket Tool to create the base of the flag. I also added a filter - Sponge to create a nice effect.


I then opened up a new file with the same dimensions. We were then given a link to the image below. This is the image that we used to create the texture of the image. I then made it black and white (grey scale) to remove the yellow tint.


Even though the elephant already has a shadow I removed it using the Magic Wand tool and created my own as the purpose of the demo was to learn. To create the shadow I copy and pasted a new elephant, filled it with black, flipped it and lowered the opacity to scale with the surroundings.

I then added an image of an aeroplane, once again I removed the background using the magic wand tool with tolerance set to 20 then put it in the original image, scaled it down to size and tweaked the contrast and brightness to help it blend in.


To make the aeroplane fit in even more, using a thin, fine brush I gently created some contrails coming out the back with an opacity of 60%.

Finally, I added a simple image of a man walking, there was no background included with this image so I just dragged it straight into the original image then scaled it down to size. I then created a shadow for the man by duplicating him, filling him in black, rotating to match and finally lowering the opacity to 70%

Create a flag using a specific technique.
We were given a demo on how to create a flag using this technique. Firstly I created a new file in Photoshop with the dimensions of 1000pixels in height by 667pixels in width. I then used the rectangular marquee Tool to create a rectangle then copied it three times and filled them with colour using the Paint Bucket Tool to create the base of the flag. I also added a filter - Sponge to create a nice effect.

I then created some decal by using the Custom Shape Tool then using the Liquify Tool. I created some text using the Text tool, I then warped it to give it a different look. After that I merged all the layers into one.


I then selected Filters, Blur, Gaussian Blur and changed the pixels from 1.0 to 3.0. I copied the image onto my original flag design on a new layer and changed the size to fit. I then selected the the drop down window located within the layers tab and selected multiply which created this effect.

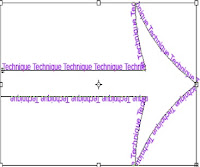
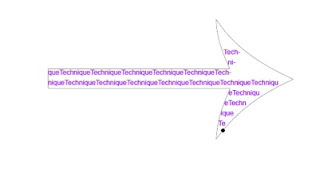
Learn to use the Text Tool with Pathways.
We were given a demo today on how to use the text tool in more detail, changing the scales of width and hieght bewtween each word etc. The screenshot below is the window with all the settings, we fiddled around with them changing different sizes and heights.

After learning about the Text Tool inside and out we put it to use. Using the Custom shape tool then selecting the middle button 'paths' i drew a shape. The special thing about the shape is that i can select certain areas of it and type using the Text Tool and the text will flow aorund the shape like so.


Creating your own Word Art.
We were given another demo, this time we were asked to create some text using the Text Tool, select the Warp Text tool and select the warp you want. then hold CMD and click on the present layer which will bring up the 'crawling ants'. I then selected a fine, smooth brush with a relatively small size, picked a colour and swiped it across part of the word. Then do the same again until the word was covered in different colours to create a great effect.


Creating Word Art using Wordle.

We were asked to create word art using yet again a different technique. This time we used a website http://www.wordle.net/ this website allows you to create randomised word art which you can change according to your liking.
No comments:
Post a Comment